Welcome to Project Anvil. If you happened to stumble across this page and are unsure what Project Anvil is, you can read more about it here.
In this first chapter you will learn how to set up the French Horns. The reason we are starting with these is because, frankly, I’m happy with how these turned out and the example of the end result below should give you a good idea of what kind of sound you can expect from this setup:
Requirements.
- A DAW that supports Kontakt. I will be using Cubase 8.5 Pro.
- The native instrument Kontakt sampler. I will be using Kontakt 6.
- The Cinematic Studio Brass library.
- An equalizer that allows modifications to just the left or just the right channel. I will be using Fabfilter Pro Q3.
- An algorithmic reverb that allows for very short decay times. I will be using Eventide SP2016 Reverb.
- A good tail reverb. I will be using Liquidsonics Cinematic Rooms.
- Panagement 2 (free!)
Kontakt setup.
Open up Kontakt in your DAW and load up 2x Solo Horn, and 1x Horns a4. The reason we’re using three horns instead of just the solo + a4 is because with three horns, we can play triads. Technically it is of course possible to play triads in either the solo or a4 patch, but with this setup we can dedicated every note in the triad to an individually positioned instrument.
Here are the steps we need to setup the instruments in Kontakt.
- For all microphone positions across all three patches, set the gain to unity (0db) and center all panning.
- Across all three patches set the kontakt volume (top right slider) to -3db. By default it will likely be at either -6 or 0db.
- Route out the microphone positions to Kontakt stereo ouputs. I’ve done it like this:
- Horn I Close -> Kt. St. 1
- Horn I Main -> Kt. St. 2
- Horn I Room -> Kt. St. 3
- Horn I Mix -> Kt. St. 4
- Horn II Close -> Kt. St. 5
- …
- Horns a4 Mix -> Kt. St. 12
- For all three instances, enable only the close and room microphone positions.
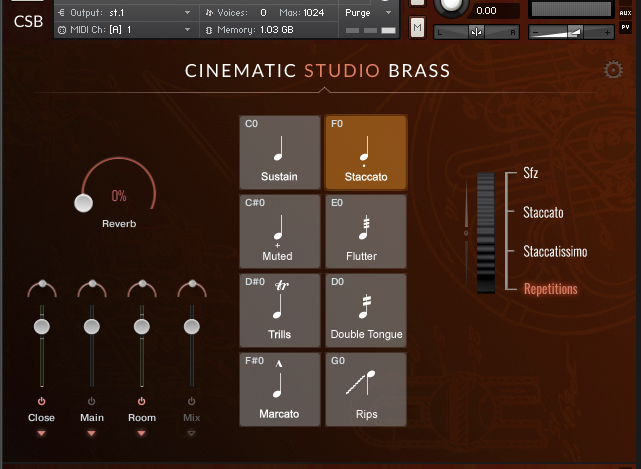
Finally, for the 2nd Solo Horn we will apply the transposition trick. That is: tune down the 2nd Solo Horn instance by two semitones within Kontakt and on the MIDI track that you will route into this second horn, add a MIDI modifier (or plugin, depending on your DAW) that transposes the incoming midi notes up by 2 semitones. Note that you will have to change the keyswitches for the 2nd Horn because of this transposition. In CSB, you can change the keyswitch for the articulation by shift-clicking on the tile for the articulation. While you’re at it, don’t forget that there’s a keyswitchable toggle for legato to (becomes visible when selecting the sustain tile) which you will also have to re-map.
Don’t overthink it. Simply apply the tuning down + MIDI modifier, shift-click the tile, and hit the “original” key for the keyswitch. For example: sustains is set to C0. When re-mapping these, simply also hit C0 on the keyboard and because of the MIDI transposition, a D0 will be registered on the tile. This is correct!
Activating outputs.
Depending on your DAW, you may need to activate the outputs. In Cubase this is done by selecting the instrument track and opening up the routing popup from the inspector (see image below).
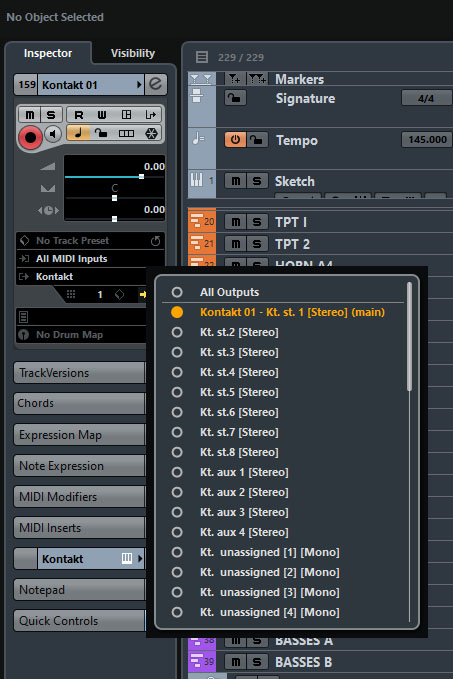
It is possible that you only see 4 stereo outputs here. In that case, you haven’t yet configured Kontakt for more than 4 stereo outputs. You have two choices: either you split out the 2x solo horns and 1x horns a4 across three separate Kontakt instances, or you enable more outputs from Kontakt using this guide.
With each microphone position now routed out to it’s own stereo output time to start adding FX, right?
Well, that depends….
Because I like to have things labeled cleanly and correctly in my project (and because it helps with the Batch Export function in Cubase), I like to route the Kontakt outputs into groups.. Yes, this is adding another layer of routing, and you can skip this step if you want by working directly on the Kt. St. 1… Kt. St. 12 outputs. It’s just a matter of personal preference.
Personally, I like to route like this:
Horn I (Kontakt) -> Kt. St. 1 -> Horn I Close (Group]) -> Horn I (Group)
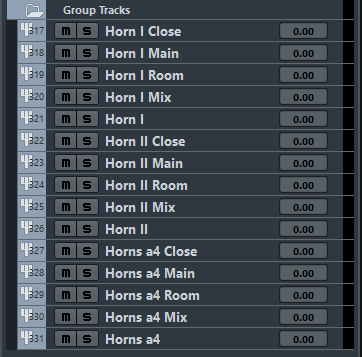
Add 15 new group tracks and label them as follows:
- Horn I Close, Horn I Main, Horn I Room, Horn I Mix, Horn I
- Horn II Close, Horn II Main, Horn II Room, Horn II Mix, Horn II
- Horns a4 Close, Horns a4 Main, Horns a4 Room, Horns a4 Mix, Horns a4
You should now have something like this in your project.
The next step is to route all associated microphone positions of each instrument into it’s instrument group. So, Horn I Close -> Horn I. Horn II Mix -> Horn II, etcetera. In the Mixconsole (F3, Cubase) your routing should look like this:
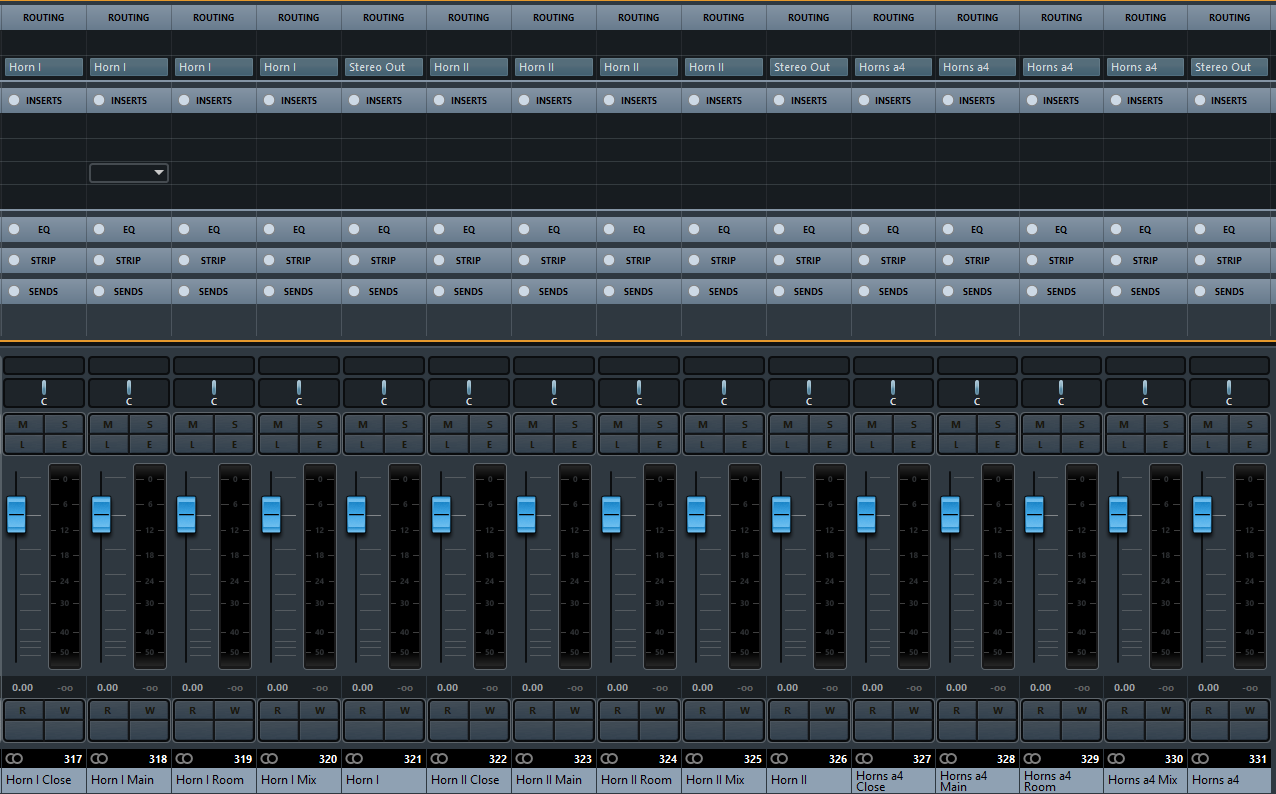
At this point it’s probably wise to check if your routing is correct by playing some notes. Since we only have the Close and Room mics enabled, you should only see the associated group channels light up in the mixconsole when playing.
Volumes.
Regardless of whether you created the group tracks or stuck with Kt. St. 1… Kt St. 12, the individual microphone levels still need to be balanced. Here are the levels I use:
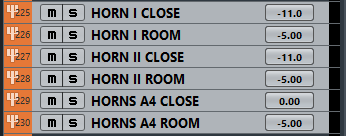
You might think that’s a lot of Close mic, and you’d be right! It won’t sound all that great if you try to play now, but it’ll be a lot better once we add….
Effects!
Let’s start with the Horns a4. Without any further processing, they’ll sound something like this:
Sounds like someone is blasting away right in front of us. Time to move the horns over to the left, and further back into the space:
Horn a4 Close – Insert 1 – Panagement.
Reverb disabled. Far = -6.95, Pan = -68.44
The purpose of this insert is simply to pan the Close mic over to the left. By giving it some distance, the volume is also reduced.

Horns a4 Close – Insert 2 – SP2016 Reverb
Input: 0db. Output 0db. Mix: 100%. Predelay: 4ms. Decay: 200ms. Position: 10%. Diffusion: 73%. Freq-Low: 300hz. Low-Gain: 0db. Freq-High 3.5khz. High-Gain: -8db.
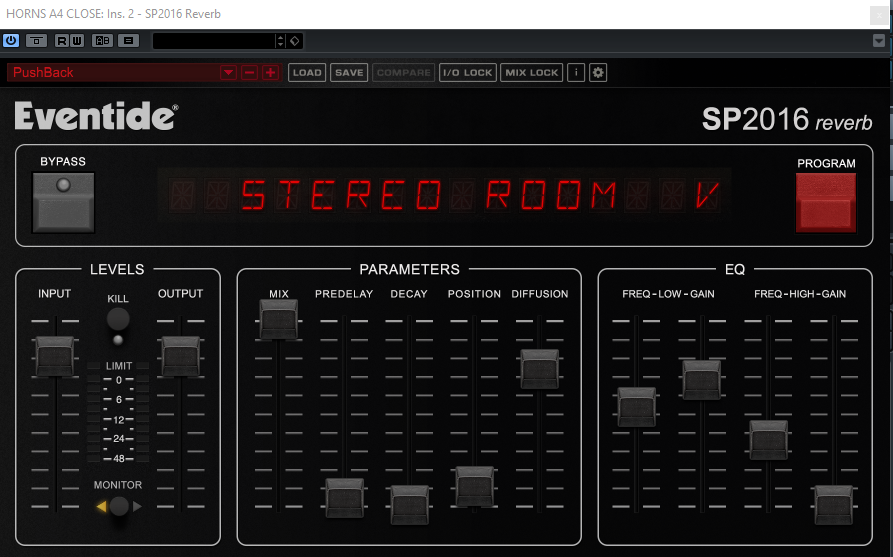
The purpose of this short algorithmic reverb is to push the instrument futher back into the space. I use these settings quite often, so it’s worth saving this out as a preset called “PushBack”. I didn’t invent this trick, it comes from this Alan Meyerson video:
If you don’t have the SP2016 Reverb, you can get close with other algorithmic reverbs, or with a very short (studio) IR reverb, like the default LA Studio reverb in REverence (just dial down the ER Tail mix to about 17 if using REverence + LA Studio, and play around with the “Mix”value).
If you want to know more about how this works, I recommend you watch Michael White’s video on “dry reverb”.
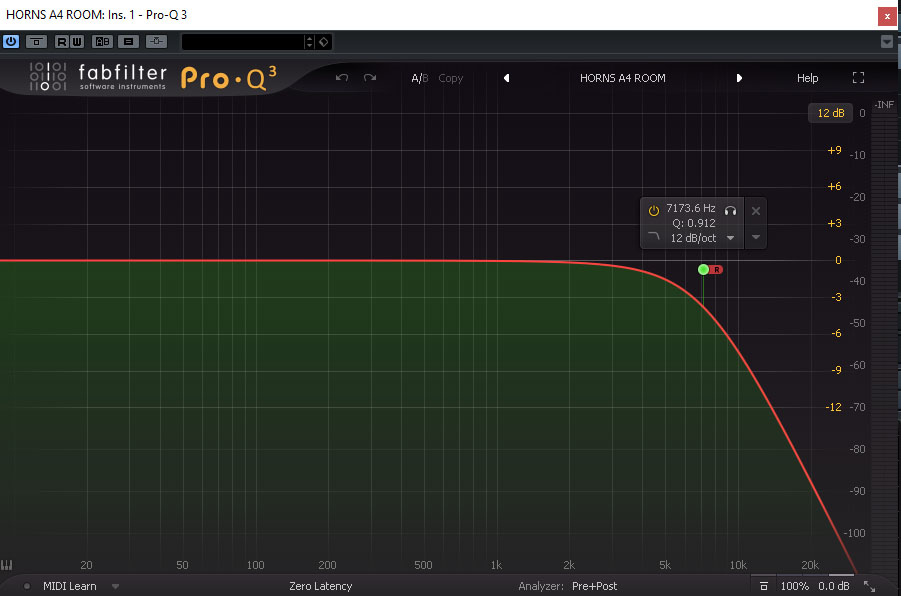
Horns a4 Room – Insert 1 – Pro Q 3
High-cut at 7173.6hz, Q: 0.912 @12db/oct, Cutting only on the Right channel.
This one is very simple. I was noticing some reflections in the high frequencies on the room mic and decided to cut them.
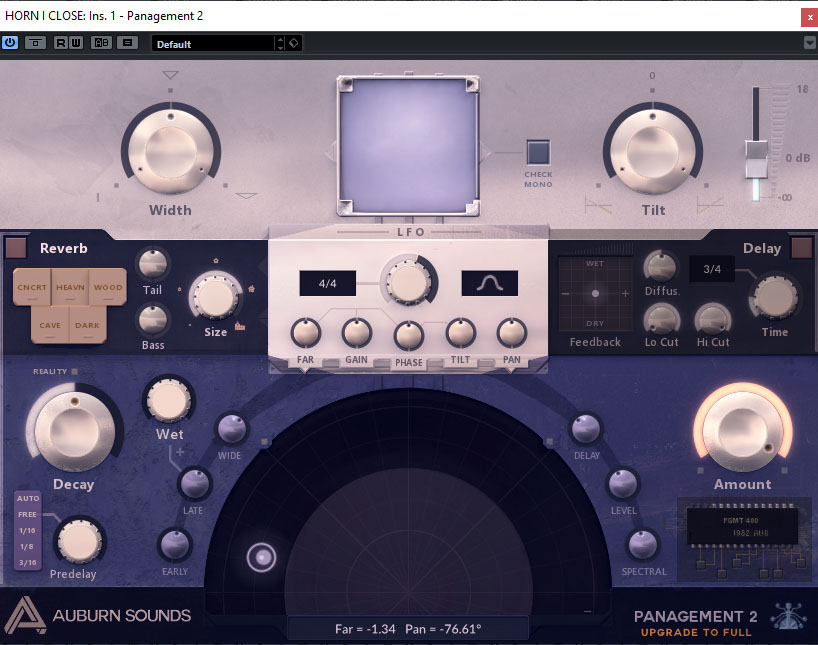
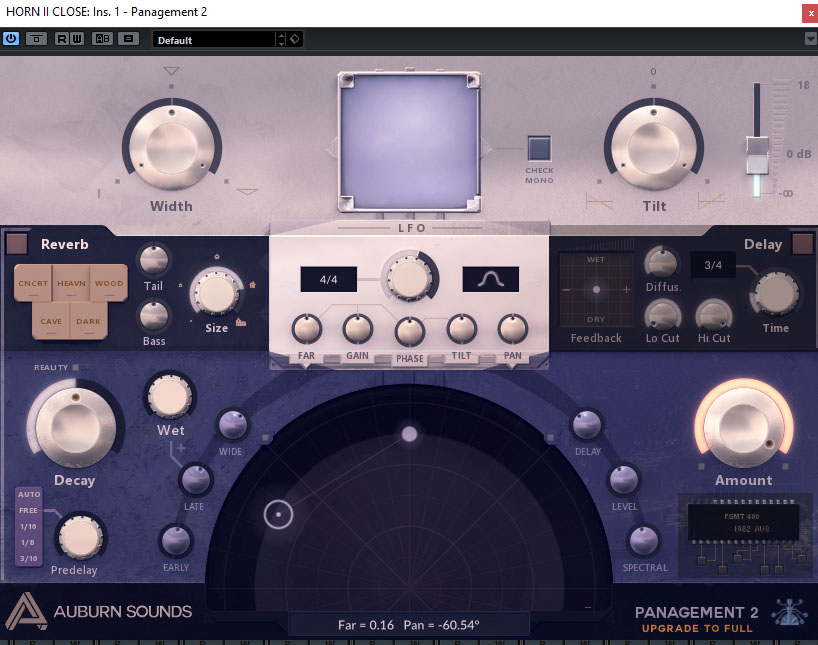
Horn I & Horn II – Close – Insert 1.
Again I am using Panagement to pan the close sound of the horns. To differentiate the two solo horns, I positioned them slightly differently.
For Horn I: Reverb Off. Far = -1.34, Pan = -76.61
For Horn II: Reverb Off. Far = 0.16, Pan = -60.54
Horn I & II Room Inserts.
In total there are 3 inserts on the Horn I & Horn II Room groups. The first two inserts are the same for both. They are:
- A 1st instance of Pro Q 3 to EQ out low end from the left channel and high-end from the right channel.
- A 2nd instance of Pro Q 3 to EQ out some mid frequencies (technically this could be joined into the 1st instance of Pro Q, I just haven’t bothered to do so).
The third insert is another instance of Panagement with slightly different settings for each horn. Yes, we’re going to pan the room.
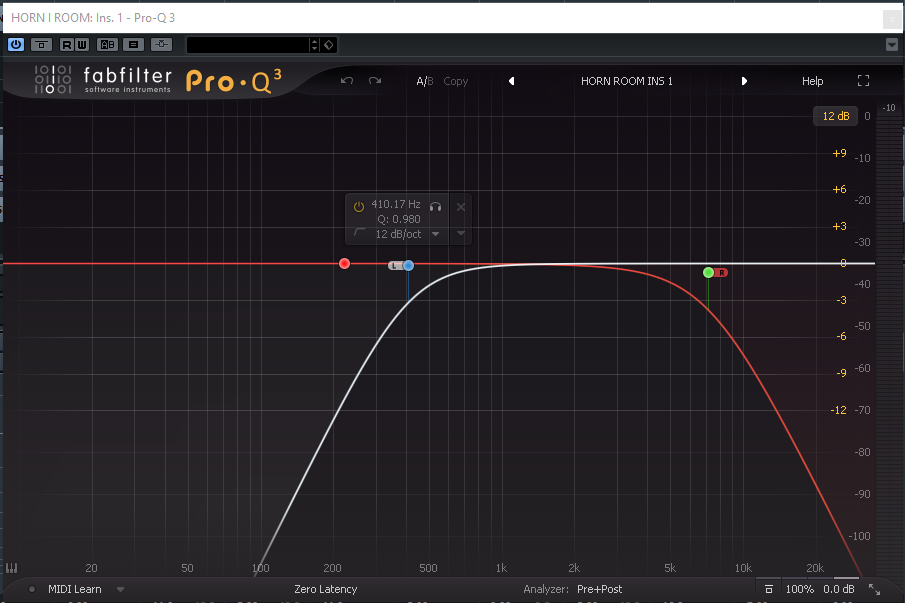
Horn I & II Room Insert 1.
Right-channel high-cut at 7173.6hz, Q: 0.912 @12db/oct + Left-channel low-cut at 410.17hz. Q: 0.9 @12db/oct.
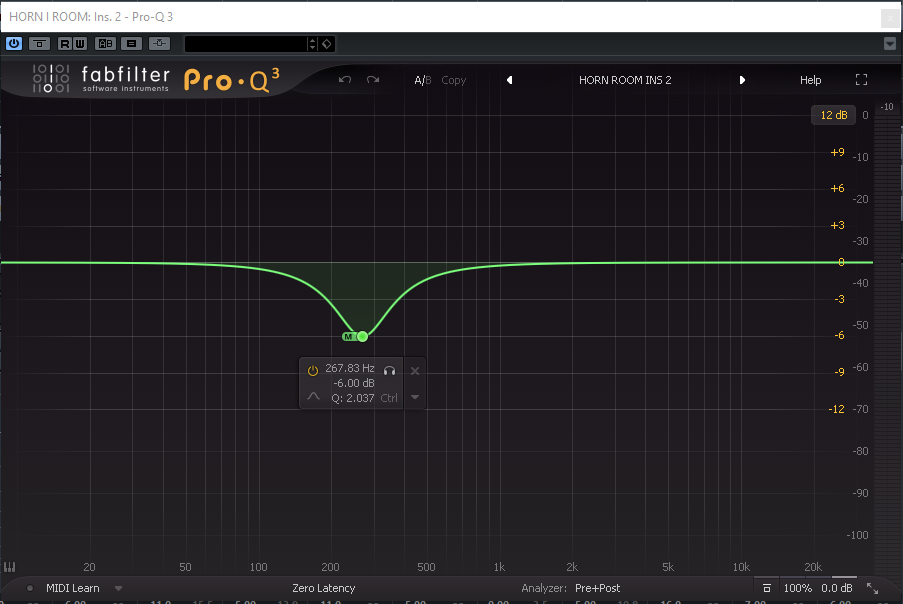
Horn I & II Room Insert 2.
Set your EQ into mid/side mode and cut only mids -6db at 267.83HZ with a Q of 2.037.
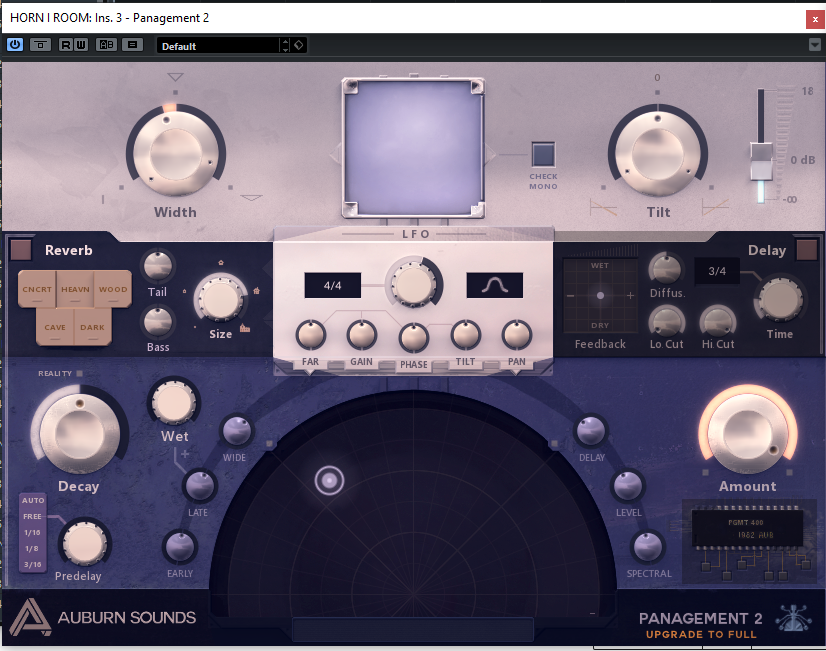
Horn I Room Insert 3
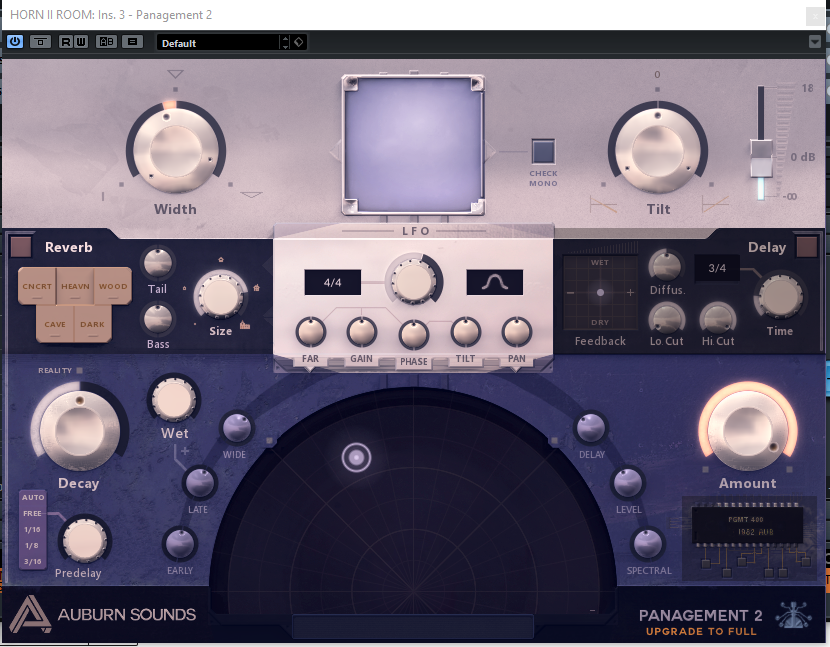
You can kind of eyeball this one, depending on how far you’re comfortable panning the room. Note there is a very slight reduction of the stereo width using the built-in Width control in Panagement. Feel free to experiment with this setting!
Horn II Room Insert 3
You can kind of eyeball this one, depending on how far you’re comfortable panning the room. Note there is a very slight reduction of the stereo width using the built-in Width control in Panagement. Feel free to experiment with this setting!
Wrapping up.
All you will need to do at this point is route MIDI tracks into the ports/inputs you have specified for the instruments (presumably 1, 2, 3 for Solo Horn I, Solo Horn II, and Horns a4 respectively). I’ll leave you with a few more closing thoughts:
My primary concern in setting these up was to add (perceived) depth to the instruments. That is: I care more about the Horns sounding like they’re some distance back into the room than that I care about the precise L/R positioning. The SP2016 Reverb is a large contributor to the perceived depth, but so is the distance in Panagement and, importantly, a reduction of stereo width can also make a sound feel further away.
If you’re mixing on headphones like I am, it’s worth to invest in a tool like Sonarworks Reference to get a flatter frequency response, but perhaps even more important is to get a cross-feeding plugin like GoodHertz Canopener, otherwise you will hardly be able to perceive the “phantom center” of the stereo image. In plain English: sound sources sound more extremely panned on headphones than they do on speakers, and with a plugin like CanOpener, you get much closer to a speaker experience. Personally, I use both in tandem. Reference first to flatten the frequency response, followed by CanOpener to provide x-feeding and a better phantom center.
You can do what you like from here, but I would advise against strong use of (tail) reverbs. The Cinematic Studio Series libraries were recorded in a studio and frankly don’t need much (or any) reverb to sound great. Err on the side of caution.
FAQ.
[kofi]